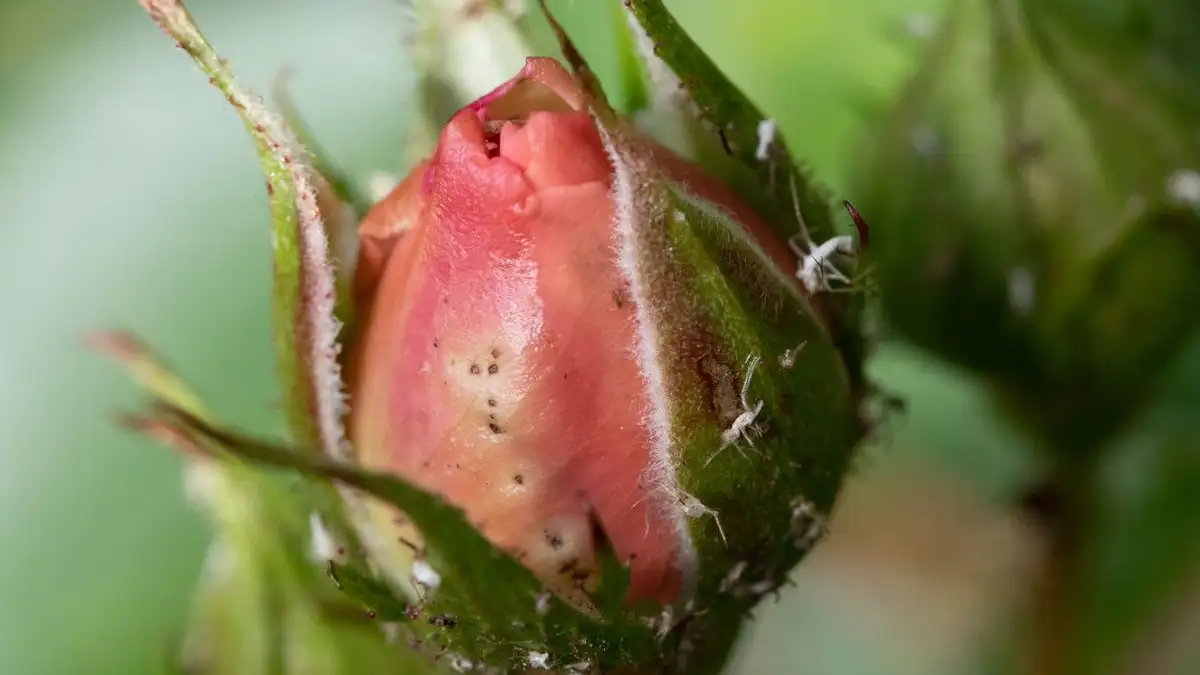
Mealybugs keep coming back because the insects you can see were never the ones that mattered. The population that restarts an infestation sits where a wipe and a spray never reach: the tight V where a leaf stalk meets the stem, inside the sheath wrapped around an unopened bud, under the inner lip of the pot rim, inside the drainage holes, and, on orchids, down among the roots. Wiping off the white fluff removes the newest and most exposed generation. The eggs and nymphs still packed into those pockets keep hatching, which is why a plant looks clean for ten days and then, suddenly, does not.
I keep a small flashlight on the shelf with my plants and use it more than any other tool I own. Angle it low, almost parallel to the foliage, and a plant tells you things a straight-on look hides. That is how I found the second colony, the one that made me stop trusting my eyes.
The wipe that worked, and then didn't
The first mealybugs I ever found were on the underside of a new leaf on a Phalaenopsis. Three or four of them, white against green, slow, obvious. I did what everyone does. Cotton swab, rubbing alcohol, dab, dab, dab, and the swab came away with a faint rust-colored stain on it. I went over the whole plant, both sides of every leaf, the stem, the crown, and I felt finished.
Two and a half weeks later there was a fresh cluster in almost exactly the same spot. Not nearby. The same spot. That detail is what finally got my attention, because I had not missed a leaf. I had missed a compartment.
The leaves were never the interesting part. Mealybugs are unarmored scale insects, soft-bodied and slow, and soft and slow means they survive by being somewhere you don't look. The white fluff you notice is the part of the colony that has already walked out into the open. It is the advertisement, not the inventory.
Where the colony actually is
Start at the leaf axil, the seam where the leaf blade wraps around the stem. Slide a fingertip down into it. There is a groove in there, often with a little dry sheath tissue left in it, and that groove is where mealybugs line up, frequently one per node, all the way up the plant. From above you see nothing. With a flashlight held at the side, the groove lights up as a row of tiny pale beads. Every one of those is a female that has not yet walked out to be seen and killed.
Then the bud sheath. New growth arrives wrapped in a sheath, and that sheath is a warm, dark, slightly damp tunnel. A female can lay several hundred eggs inside a single cottony sac tucked down in there, and the sac itself just looks like a scrap of lint caught on the plant. You get distorted new leaves and a flower spike that starts and then stalls, and you blame the window or the fertilizer. It was neither.
Then get under the pot. Flip it and look at the inner lip of the rim, where the rim curls back on itself. There is a narrow ledge there, usually holding old bark dust and a mineral crust from water running over it, and it is one of the most reliable hiding places in the whole setup: dark, dry, untouched by any spray, and almost impossible to see while the pot is sitting upright on a shelf. The drainage holes matter the same way. If there is a saucer underneath, check the gap between the saucer and the base of the pot too.
And on orchids, go deeper. Mealybugs on a Phalaenopsis favor the leaf bases, right down at the crown where the leaves meet, and the new root tips at the surface of the medium. That is why the symptoms look like a cultural problem instead of a pest problem: new leaves that come out small or asymmetric, leaf bases that yellow and drop, a spike that refuses to elongate. Nobody is chewing holes in anything. The plant is being drained at the point where it grows.
One more thing that took me too long to accept: the movement is on foot. Nymphs are small enough to simply walk from one pot to the next, and a shelf where pots sit shoulder to shoulder is a shelf with no border. My first round of treatment failed partly because the plant next door was already colonized and I never checked it. It looked fine the whole time. When I find mealybugs now, I pull the neighboring pots apart by a few inches for a month, and I check every one of them, not just the one with visible fluff.
Ants mean the infestation is moving
One morning I found a thin line of ants climbing the side of a pot. It is tempting to treat that as a separate ant problem and go after the ants, but ants farm mealybugs. They drink the honeydew the mealybugs produce, they carry nymphs to new plants, and they will defend a colony from anything that bothers it. A trail of ants on an indoor plant shelf is not a second pest. It is a delivery service, and it means the infestation is being relocated faster than you can swab.
Follow the trail instead of stopping it. Where do the ants come from, where do they go, which pots are along the route. Then check every pot on that route, including the tidy ones.
The calendar is half the treatment
Rubbing alcohol on a cotton swab kills a mealybug on contact. That part is not complicated and it is not the hard part. The hard part is the timing, because eggs do not all hatch at once. They hatch over a rolling window, so any single pass only catches what happens to be out and exposed that day. Everything still sealed inside a sac is untouched.
So I go back every 7 to 10 days. Seven in a warm room, closer to ten in a cool one, because hatch rate follows temperature. And I do not stop at the first clean pass. I stop after two clean passes in a row, roughly two weeks apart, with nothing found anywhere on the plant, under the rim, or in the saucer. One clean look only means I happened to check during a gap between hatches. That is the whole reason mealybugs have a reputation for being unbeatable. People quit on the clean day.
Where the swab method runs out
The swab only works where the swab can go. On a plant with tightly stacked growth, an orchid crown where the leaves overlap so closely you cannot slide a swab past the outer edge, you will clean the outside of the seam and never touch the inside. That is a genuine limit of the method, not a failure of technique. If that is what you are looking at, the honest options are to take the plant apart at repotting time so the crown is reachable, or to accept that this plant is not worth the shelf space it occupies. Letting one go is a real answer, and it is often kinder to the rest of the collection than a plant you fight for a year.
Repotting is the reset, so treat the container as part of it
When I repot something that has had mealybugs, the old medium goes straight out. Not dried and saved, not dumped into a bin to reuse. Egg sacs and settled nymphs sit in the bark and in the fine dust that collects at the bottom of a pot, and reusing it is just relocating the problem to a clean plant. The pot gets the same suspicion. I scrub the inner lip of the rim, both sides of the drainage holes, and the water line with a stiff brush, because the container is not a neutral object sitting under the plant. It is one of the hiding places.
Then, two weeks later, out comes the flashlight again. Low angle, light raking across the plant. Nothing in the axils. Nothing under the rim. Nothing in the saucer. That is the only kind of done I believe.